Build & Run
Build and run your iOS app on a simulator or device directly from the VSCode sidebar. SweetPad drives xcodebuild
under the hood, the same tool Xcode uses.
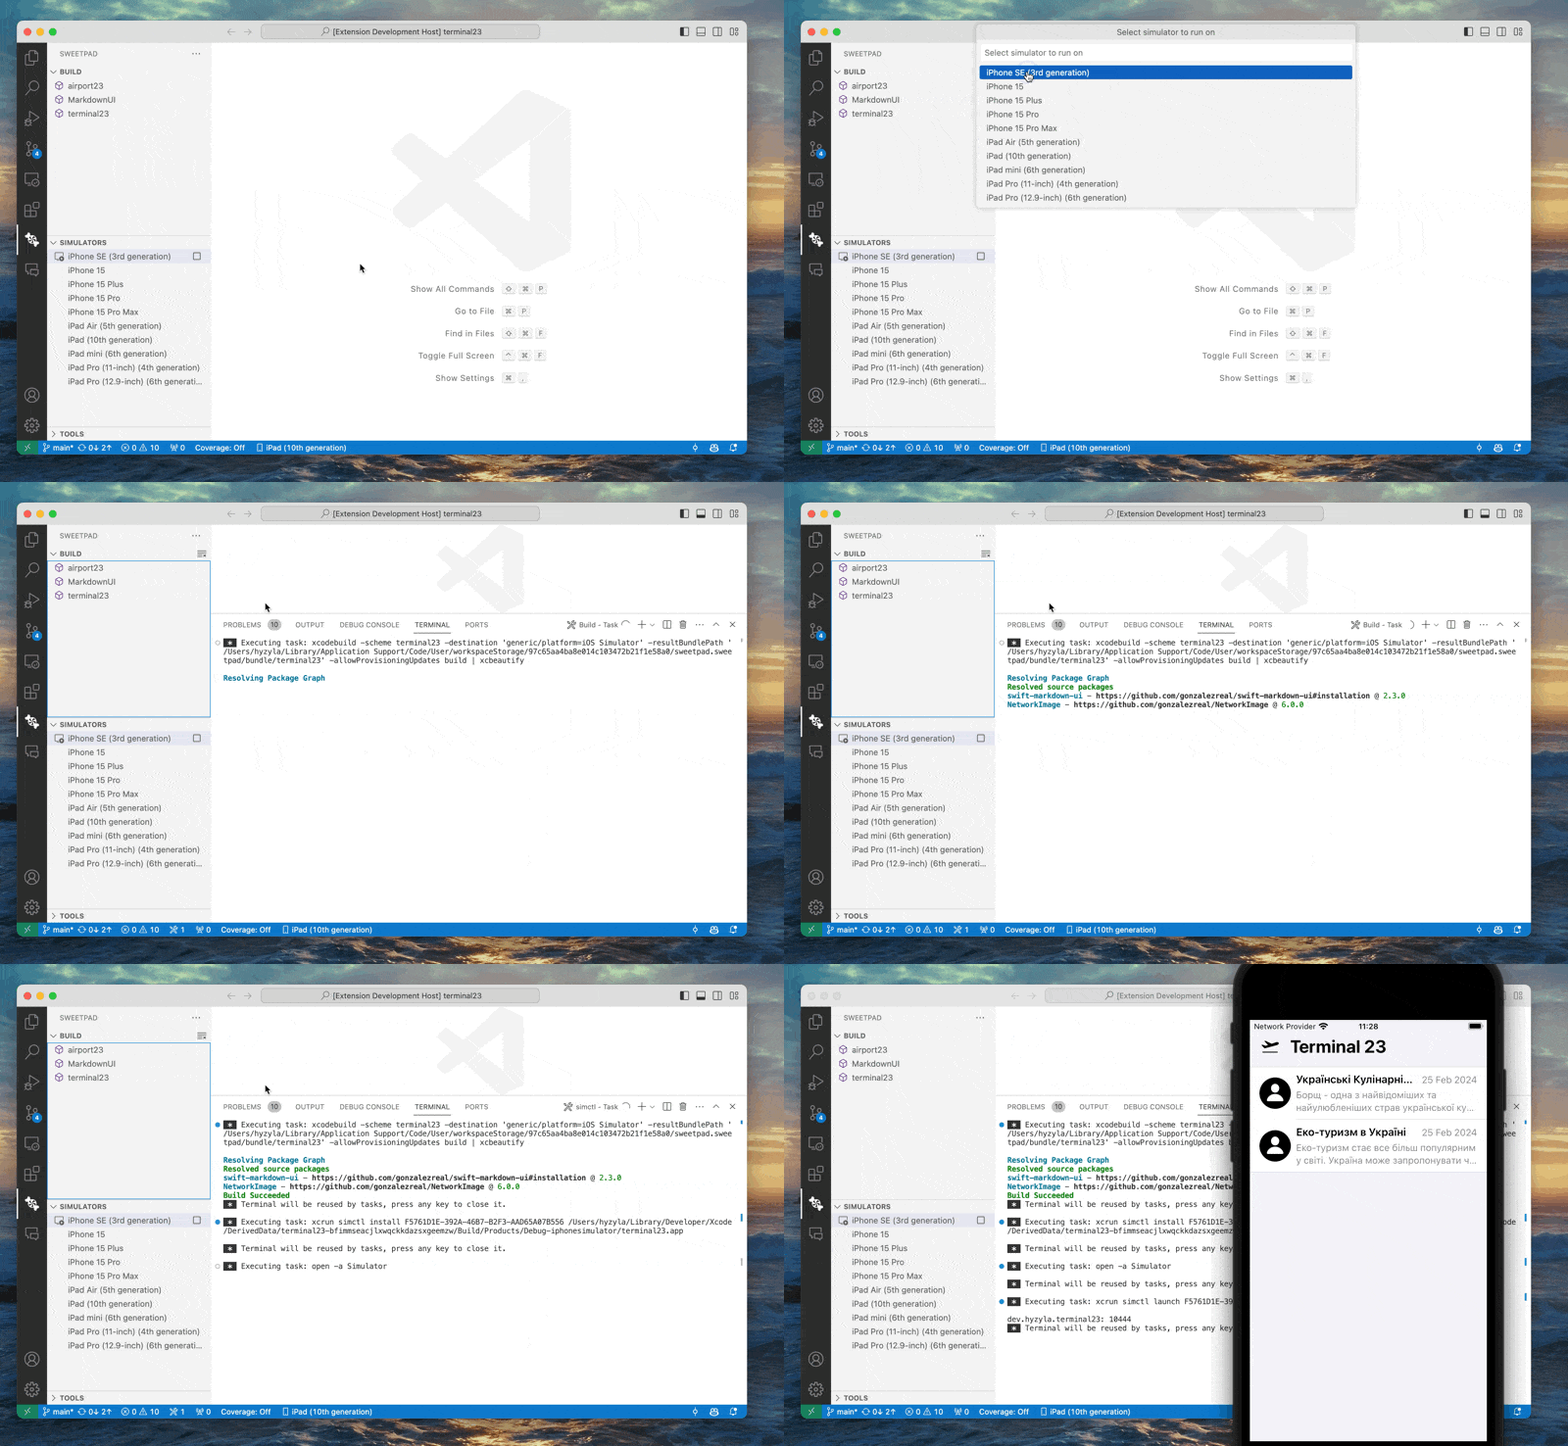
Open the folder containing your Xcode project, then open the SweetPad sidebar on the left side of VSCode, go to the Build section, and click ▶️ next to the scheme name. SweetPad asks you to pick a simulator or device, then builds and launches the app on it.
The destination picker lists the destinations the scheme can run on first, under Supported platforms. When a scheme builds more than one app, SweetPad launches the one the scheme's Run action names, as Xcode does.
For prettier build output, install xcbeautify:
brew install xcbeautify
Or use the Tools panel in the SweetPad sidebar to install xcbeautify and the other tools SweetPad
integrates with.
Build view at a glance
-
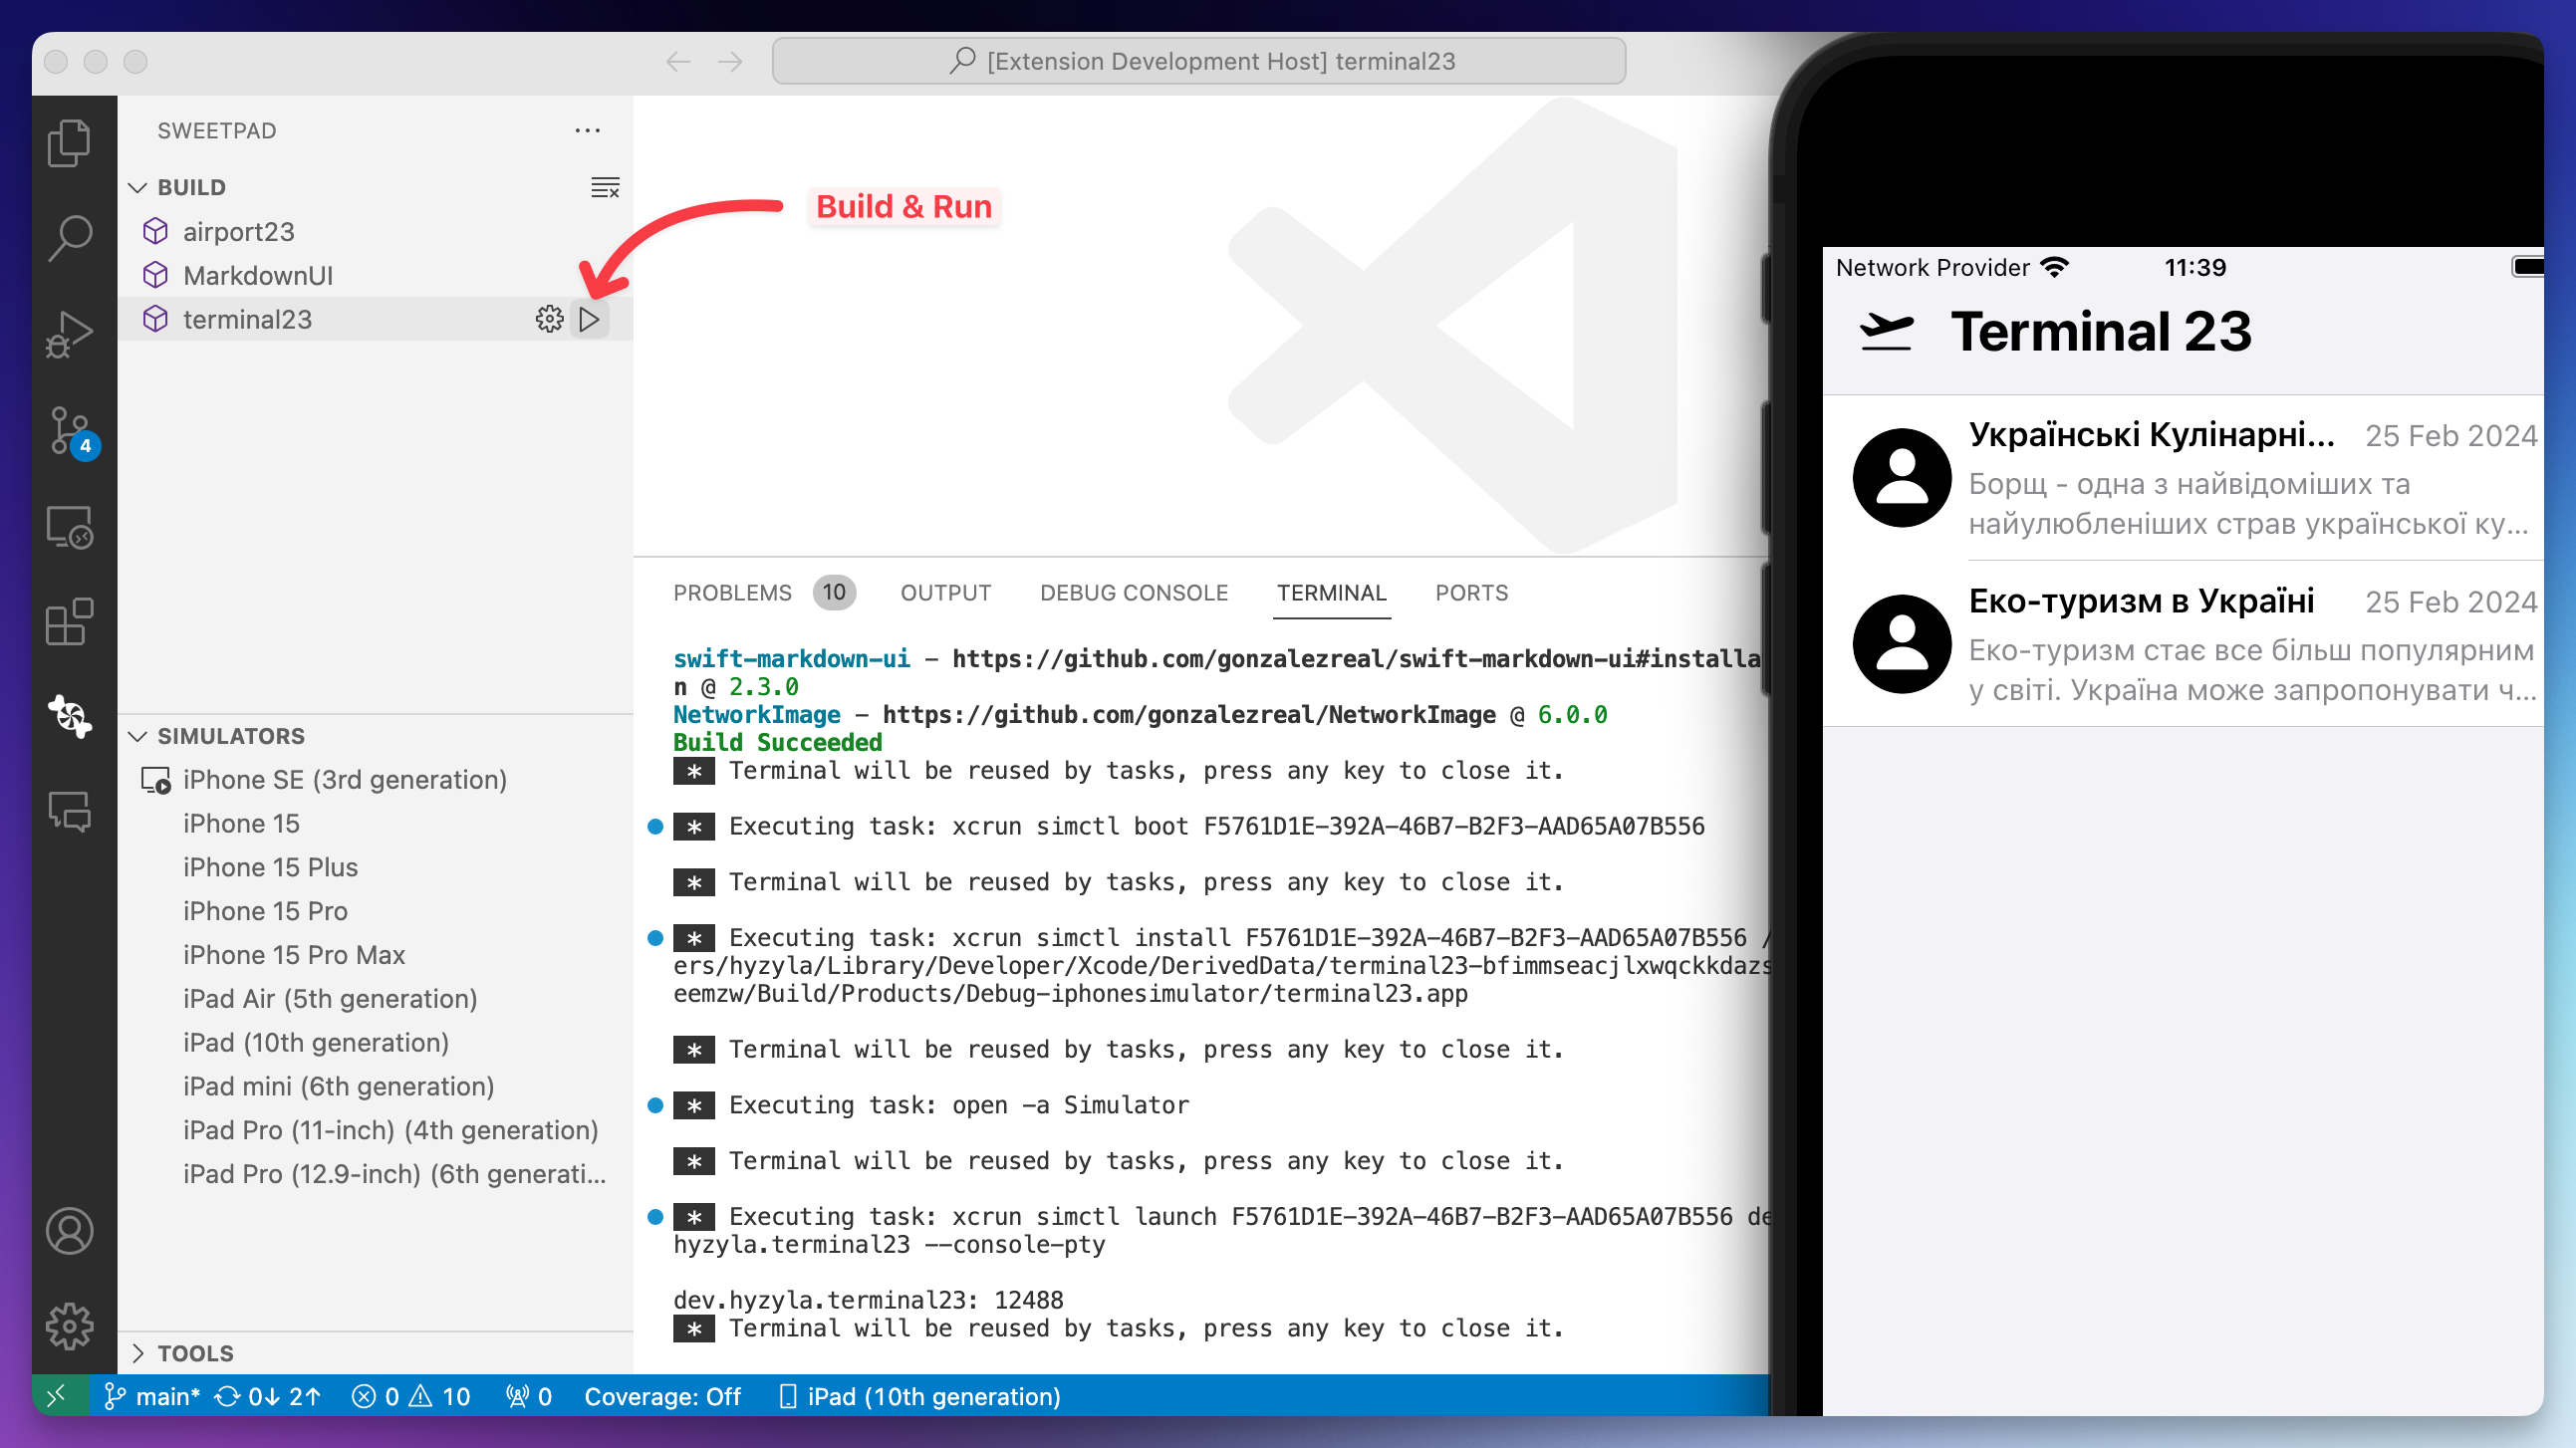
▶️ Build & Run: click the play button next to the scheme name to build and run the app on the active destination.
-
⚙️ Build: click the gear button next to the scheme name to build without running.
-
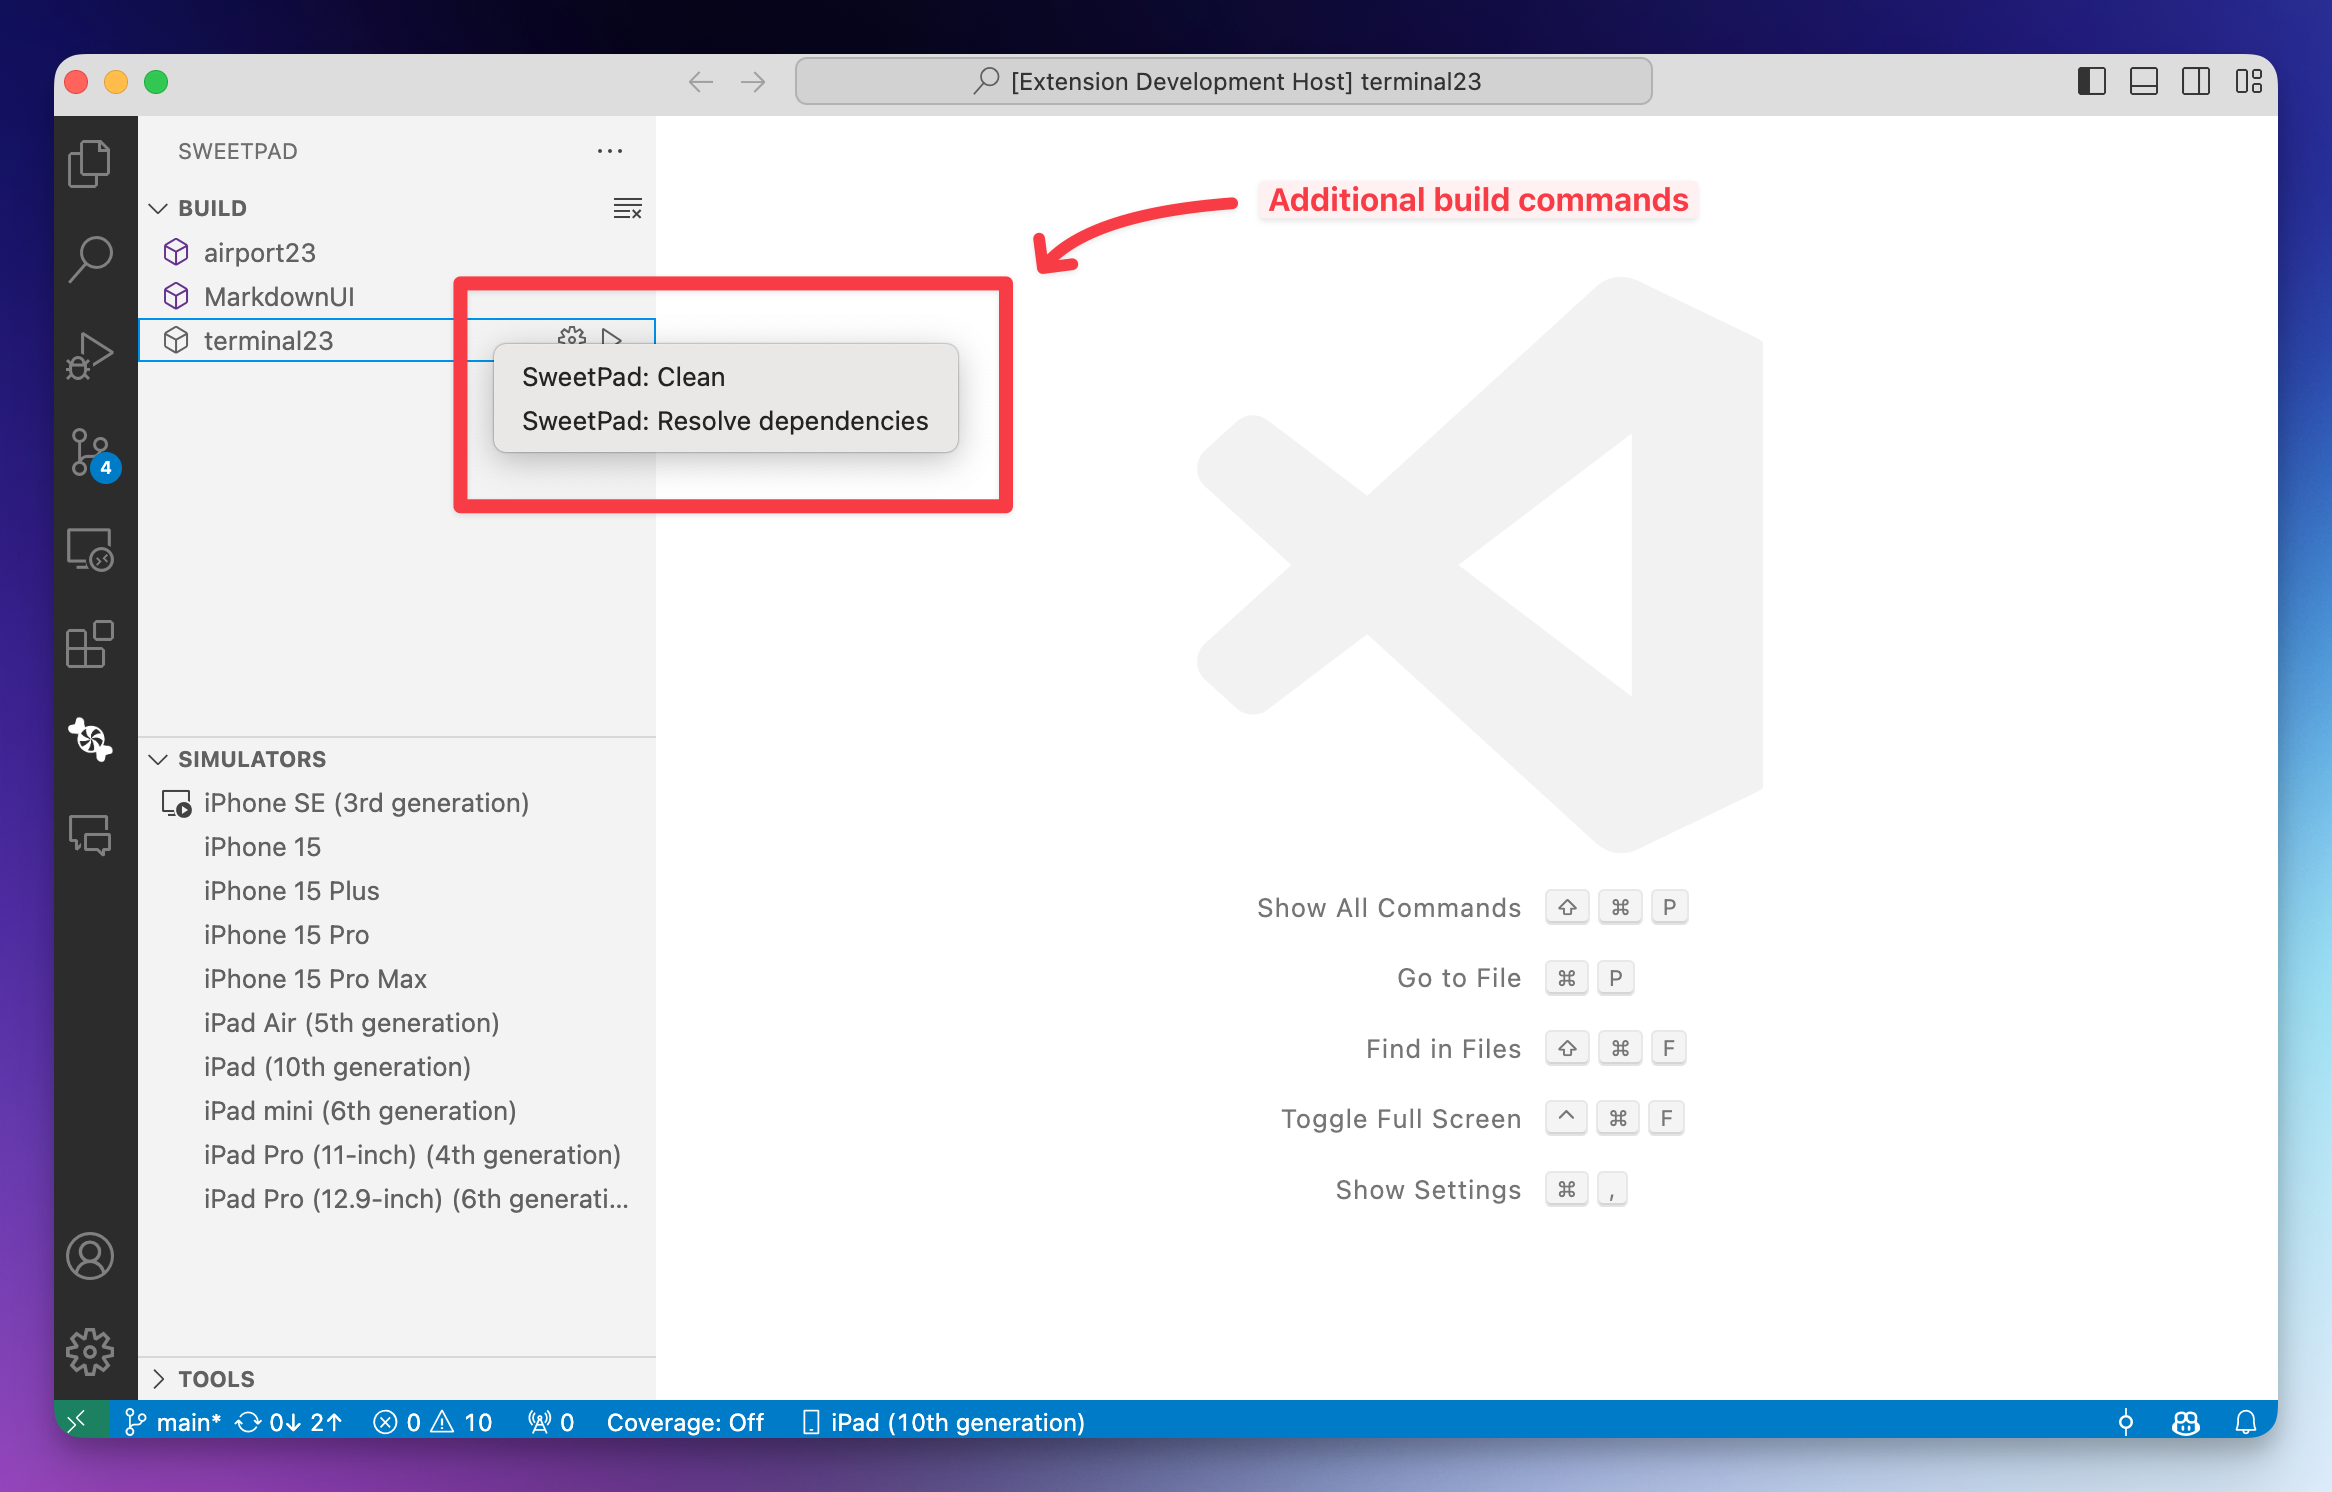
SweetPad: Clean: right-click the scheme name to find this option. Cleans the build folder and derived data.
-
SweetPad: Resolve Dependencies: right-click the scheme name and pick this to resolve Swift Package Manager dependencies.
Stop a running build or app
Long builds, runaway test runs, or apps that won't terminate on their own can all be cancelled in one click. While
a scheme is running, a ⏹ stop icon appears inline next to it in the Build view. Click it, or run
SweetPad: Stop build / running app from the command palette. SweetPad kills the underlying xcodebuild or app
process and frees up the terminal.
If you closed the terminal panel and the play button still shows a spinner, the process is probably still alive. Use Stop build / running app to clean it up.
Filter which schemes appear in the Build view
Large Xcode workspaces often expose dozens of schemes (feature modules, test bundles, dynamic libraries, host apps), most of which you never build by hand. You can hide the noise without touching the project file:
{
  "sweetpad.build.schemes.include": ["MyApp", "Feature*"],
  "sweetpad.build.schemes.exclude": ["*Tests", "*UITests"]
}
include: only schemes matching at least one pattern are shown. Empty means "show everything".exclude: applied on top ofinclude; matching schemes are hidden.- Patterns support
*as a wildcard.
When a filter is active, a pause/apply toggle appears in the Build view title bar so you can temporarily peek at every scheme without editing the settings. Click it once to pause the filter (SweetPad: Pause scheme filter), click again to re-apply it (Apply scheme filter). The magnifier 🔎 button next to it searches the visible schemes.
Swift Package Manager (SPM) support
SweetPad detects Package.swift at the workspace root and exposes the package's products as schemes, and the same Build &
Run / Build / Test flow works without an Xcode project. Configurations default to Debug and Release. Tests
declared with XCTest or Swift Testing show up in the Testing panel as usual.
You can mix and match: if a folder contains more than one of Package.swift, .xcworkspace, or .xcodeproj,
SweetPad asks which one to use the first time you build and remembers your choice. Switch later with
> SweetPad: Select Xcode workspace or by editing sweetpad.build.xcodeWorkspacePath directly.
Tasks
SweetPad registers a VSCode task provider, so the build/run actions show up under Tasks: Run Task in the command
palette without any setup.
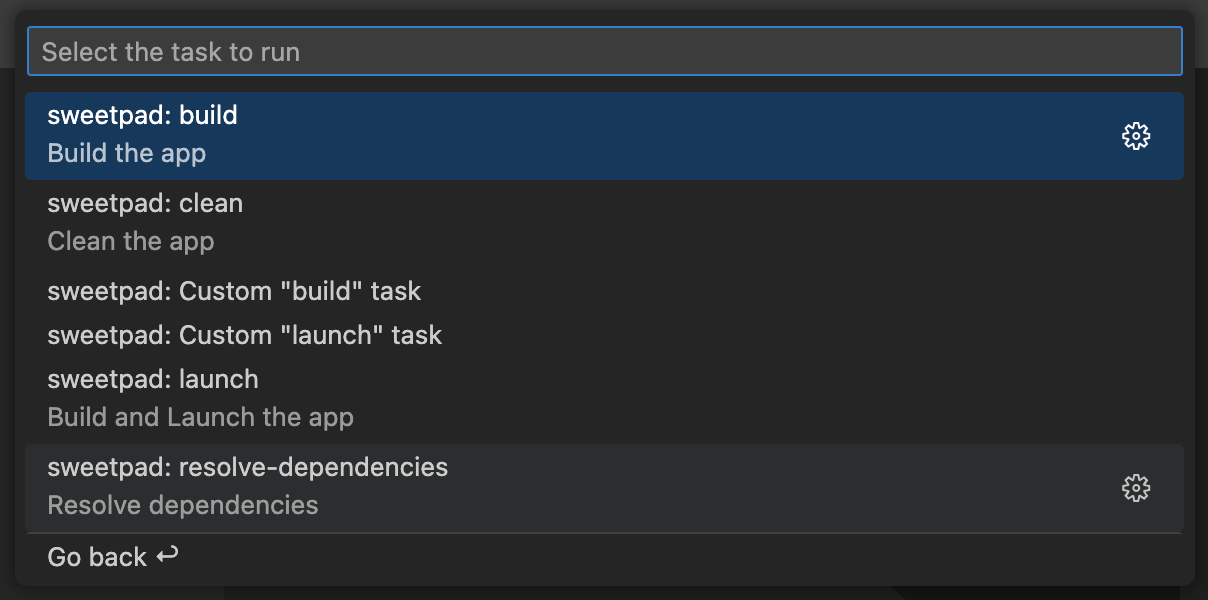
You can also wire them into .vscode/tasks.json to compose them with other tasks or bind them to keyboard shortcuts:
{
  "version": "2.0.0",
  "tasks": [
    {
      "label": "SweetPad: Build",
      "type": "sweetpad",
      "action": "launch",
      "problemMatcher": ["$sweetpad-watch"],
      "scheme": "terminal23",
      "configuration": "Debug"
    }
  ]
}
For tasks used as a debugger pre-launch step, isBackground: true and the $sweetpad-watch problem matcher are both
required so VSCode knows when the build is ready and the app is launching:
{
  "version": "2.0.0",
  "tasks": [
    {
      "type": "sweetpad",
      "action": "launch",
      "problemMatcher": ["$sweetpad-watch"], // ! Required for debugging
      "label": "sweetpad: launch",
      "detail": "Build and launch the app",
      "isBackground": true // ! Required for debugging
    }
  ]
}
Set the Xcode workspace path
If your repo contains multiple .xcworkspace / .xcodeproj files, pin the one SweetPad should use:
{
  // Path to your Xcode workspace (.xcworkspace file)
  // The path can be absolute or relative to the folder in which VSCode is opened.
  "sweetpad.build.xcodeWorkspacePath": "/path/to/your/workspace"
  // Examples:
  // "sweetpad.build.xcodeWorkspacePath": "terminal23.xcodeproj/project.xcworkspace"
  // "sweetpad.build.xcodeWorkspacePath": "terminal23.xcworkspace"
  // "sweetpad.build.xcodeWorkspacePath": "/Users/username/Projects/terminal23.xcworkspace"
}
For an interactive shortcut, run > SweetPad: Select Xcode workspace from the command palette. It picks the
workspace and writes it to your settings.
If you don't configure a path, SweetPad asks the first time you build and remembers the choice in its cache. Clear
that cache with > SweetPad: Reset Extension Cache if you need to pick again.
If your project contains only one workspace, SweetPad finds it automatically, with no configuration needed.
Set the scheme and destination
Pin the scheme and run destination the same way you pin the workspace path, which helps for agents, CI-like local workflows, or skipping the QuickPick every time:
{
  "sweetpad.build.scheme": "MyApp",
  "sweetpad.build.destination": {
    "type": "iOSSimulator",
    "id": "iossimulator-AAAAAAAA-BBBB-CCCC-DDDD-EEEEEEEEEEEE"
  }
}
scheme: exact scheme name from the Xcode project. A name the project doesn't have gets a warning, and builds fail until you fix or remove the setting.destination:idandtypeare required. Easiest is> SweetPad: Select destination(or click a destination in the sidebar) and choose to save it to settings. To write it by hand, paste the plain UDID fromxcrun simctl listor Xcode's device list, sincetypealready says what kind of thing it is:
{
  "sweetpad.build.destination": {
    "type": "iOSSimulator",
    "id": "AAAAAAAA-BBBB-CCCC-DDDD-EEEEEEEEEEEE"
  }
}
The setting holds identity only, with no display name. SweetPad resolves the label from the destination itself, so once it has listed destinations the status bar reads "iPhone 16" rather than a UDID, and follows along if you rename the simulator. Until then it shows the id you wrote.
The picker writes a fully qualified id instead, which is also accepted. Those ids carry a prefix per platform, and it
doesn't always match the type spelling:
type | id |
|---|---|
iOSSimulator | iossimulator-<udid> |
watchOSSimulator | watchossimulator-<udid> |
tvOSSimulator | tvossimulator-<udid> |
visionOSSimulator | visionsimulator-<udid> |
iOSDevice | iosdevice-<udid> |
watchOSDevice | watchosdevice-<udid> |
tvOSDevice | tvosdevice-<udid> |
visionOSDevice | visionosdevice-<udid> |
macOS | macos-<computer name> |
generic | generic-<platform> |
Three break the pattern: visionOSSimulator drops the os, macOS uses your computer's name instead of a UDID,
and generic names a platform, since there is no device to name. That is why pasting the bare value and letting
type supply the prefix is the safer habit. An id SweetPad doesn't recognise isn't reported as an error; it just
falls through to the picker on every build.
Unset = SweetPad asks the first time and remembers the choice in its cache. Settings always win over that cache, so
> SweetPad: Reset Extension Cache clears the cache but leaves a pinned setting deciding the answer.
sweetpad.build.destination is machine-specific. Simulator UDIDs differ on every Mac and change when you delete and
recreate a simulator, and the macOS id contains your computer's name. When the pinned destination isn't there,
SweetPad asks you to pick again and rewrites the setting with your choice rather than re-prompting on every build,
which means a committed .vscode/settings.json shows up as a local edit on each machine. For a shared project, pin
the scheme and leave the destination to each developer.
Build for a whole platform
Xcode's device-less "Any iOS Device" and "Any iOS Simulator Device", plus the Mac, watchOS, tvOS and visionOS
equivalents, live under Generic (build-only) in the Destinations view. They pin no simulator or device, so
xcodebuild gets -destination generic/platform=iOS and you can build or archive for a platform with nothing
attached and nothing booted.
Nothing runs on them, so SweetPad leaves them out of the run, debug and testing pickers. If one is already pinned in
your settings, Run and Test stop with a message telling you to pick a simulator or device, instead of failing inside
xcodebuild.
With "type": "generic" the bare platform works in any capitalisation, so iOS Simulator, ios-simulator and
generic-ios-simulator all name the same destination:
| Destination | id |
|---|---|
| Any iOS Device | generic-ios |
| Any iOS Simulator Device | generic-ios-simulator |
| Any Mac | generic-macos |
| Any watchOS Device | generic-watchos |
| Any watchOS Simulator Device | generic-watchos-simulator |
| Any tvOS Device | generic-tvos |
| Any tvOS Simulator Device | generic-tvos-simulator |
| Any visionOS Device | generic-visionos |
| Any visionOS Simulator Device | generic-visionos-simulator |
A task names one the same way, either by that id or by the -destination string itself:
{
  "type": "sweetpad",
  "action": "build",
  "destination": "generic/platform=iOS"
}
Set DerivedData path
xcodebuild writes its intermediate files into ~/Library/Developer/Xcode/DerivedData/ by default. If you'd rather
keep them inside the project (so each repo has its own derived data, or so a CI cache survives xcodebuild clean),
override the path:
{
  "sweetpad.build.derivedDataPath": "/path/to/your/derivedData"
  // Examples:
  //
  // 1. Relative path to the folder in which VSCode is opened:
  // "sweetpad.build.derivedDataPath": ".build/derivedData"
  //
  // 2. Absolute path:
  // "sweetpad.build.derivedDataPath": "/Users/hyzyla/Projects/sweetpad/derivedData"
}
A -derivedDataPath in sweetpad.build.args wins over this setting. Builds, app launches and autocomplete all use
the same location.
Pass extra arguments to xcodebuild
Pass any extra xcodebuild flags through sweetpad.build.args. For example, to skip Swift macro validation:
{
  "sweetpad.build.args": ["-skipMacroValidation"]
}
A flag in this list replaces the one SweetPad passes itself, such as -destination or -derivedDataPath. Flags that
xcodebuild accepts more than once, such as -skip-testing or -only-testing, keep every copy in order. For other
flags, the last copy wins.
SweetPad reads these arguments when it looks for the app to launch, too. A PRODUCT_NAME=,
PRODUCT_BUNDLE_IDENTIFIER= or SYMROOT= setting, an -xcconfig, or a -configuration here changes which app gets
installed and launched, just as it changes what gets built.
You can also pass environment variables to xcodebuild itself (not to the launched app) with sweetpad.build.env.
This is useful for forwarding tokens or paths that your project's build scripts read from the environment:
{
  "sweetpad.build.env": {
    "MY_BUILD_TOKEN": "secret",
    "DERIVED_DATA": "${env:DERIVED_DATA}"
  }
}
Set a value to null to explicitly unset an inherited variable.
Use a different xcodebuild (e.g. Xcode-beta)
If you need a non-default xcodebuild, to build against Xcode-beta, to pin a specific toolchain, or to wrap
xcodebuild with a logger, point SweetPad at the binary you want:
{
  "sweetpad.build.xcodebuildCommand": "/Applications/Xcode-beta.app/Contents/Developer/usr/bin/xcodebuild",
  "sweetpad.build.swiftCommand": "/Applications/Xcode-beta.app/Contents/Developer/Toolchains/XcodeDefault.xctoolchain/usr/bin/swift"
}
Both settings expand ${env:VAR_NAME} placeholders, so you can drive the path from your environment:
{
  "sweetpad.build.xcodebuildCommand": "${env:XCODEBUILD_PATH}"
}
Pass launch arguments and environment variables to the app
sweetpad.build.launchArgs and sweetpad.build.launchEnv are forwarded to the app when it starts on a simulator or
device. For example:
{
  "sweetpad.build.launchArgs": ["--my-arg"],
  "sweetpad.build.launchEnv": {
    "MY_ENV_VAR": "my-value"
  }
}
You can also set them per-task in .vscode/tasks.json:
{
  "version": "2.0.0",
  "tasks": [
    {
      "type": "sweetpad",
      "action": "launch",
      "problemMatcher": ["$sweetpad-watch"],
      "label": "sweetpad: launch",
      "detail": "Build and launch the app",
      "isBackground": true,
      "launchArgs": ["--my-arg", "value"],
      "launchEnv": {
        "MY_ENV_VAR": "value"
      }
    }
  ]
}
Inherit args / env / language from the scheme's Launch Action
If your scheme's Run action in Xcode already defines launch arguments, environment variables, an App Language,
or an App Region, SweetPad applies them automatically when running the app. This means the same scheme behaves
the same way whether it's launched from Xcode or from VSCode, with no need to copy values into settings.json.
The mapping:
- Enabled
<CommandLineArgument>entries →launchArgs. Each entry is split into words the way a shell splits it, so-Name "a b"becomes two arguments,-Nameanda b. - Enabled
<EnvironmentVariable>entries →launchEnv. - SweetPad fills in build settings in either one, like
$(SRCROOT)or$(PRODUCT_NAME), from the app's build settings. language="fr"→ adds-AppleLanguages (fr) -AppleTextDirection NO. A right-to-left language such ashegets-AppleTextDirection YES.language="fr"+region="FR"→ also adds-AppleLocale fr_FR.region="FR"on its own → adds-AppleLocalewith your Mac's language, such asen_FR.
Anything you put in sweetpad.build.launchArgs / sweetpad.build.launchEnv is appended to the values from the
scheme, so workspace overrides always win over scheme defaults.
Keep the Simulator in the background on launch
By default SweetPad brings the Simulator app to the foreground every time it launches your app. If you'd rather stay in VSCode, which is typical when you're driving the Simulator through a keyboard automation tool or running headless during hot-reload iterations, turn that off:
{
  "sweetpad.build.bringSimulatorToForeground": false
}
Build for x86_64 on Apple Silicon (Rosetta)
On M-series Macs, you may occasionally need to build for x86_64, for example to reproduce a CI environment, debug an Intel-only crash, or work with a framework that doesn't yet ship arm64 slices. Two settings cover this:
{
  "sweetpad.build.arch": "x86_64",
  "sweetpad.build.rosettaDestination": true
}
arch controls how the app is compiled; rosettaDestination tells SweetPad to prefer the Rosetta variant of the
target simulator. Leave both at their defaults for normal arm64 development.
Auto-refresh schemes when project files change
SweetPad watches Package.swift, .xcodeproj, and .xcworkspace files in the background and refreshes the scheme
list whenever they change, which helps right after a tuist generate, xcodegen, or a freshly-added SPM target. If the
refresh is noisy (very large repos, dozens of frequent writes), tune it:
{
  "sweetpad.build.autoRefreshSchemes": true,
  "sweetpad.build.autoRefreshSchemesDelay": 1500
}
Set autoRefreshSchemes to false to opt out entirely; refresh manually with the ↻ button in the Build view or
> SweetPad: Refresh schemes.